If your off-road machinery starts with difficulty, fuel consumption is too high, or under load, power output is not stable, the root cause may not be as complicated as it seems. Worn or damaged spark plugs can lead to misfiring, unstable idle, and even reduce the operational efficiency and service life of the equipment. In this guide, we will explain the importance of replacing spark plugs, the steps to replace spark plugs, and the troubleshooting methods after replacement. Whether you maintain a forklift, ATV, tractor, or excavator, this guide will help you keep the engine running smoothly and reliably.
What to Check Before You Change?
Before replacing your spark plug, a little preparation helps you work safely and avoid mistakes.
1. Choose the Correct Spark Plug
Every engine needs a specific plug type with the right thread size, heat range, and electrode gap. Using the wrong one can cause misfires or even engine damage. Always check your operator’s manual or use FridayParts’ part search tools to find the right off-road spark plug for your machine. Never assume automotive plugs will fit — off-road engines face tougher vibration and dust.
2. Gather Essential Tools
Have these items ready before you begin:
- Ratchet wrench and spark plug socket
- Torque wrench
- Gap gauge
- Compressed air or a clean brush
- Dielectric grease and a shop towel
Tip: Use a small amount of anti-seize compound on the threads only if recommended by your engine guide.
How to Change Your Spark Plug?
Now that you’ve prepared everything, follow these steps carefully to replace your spark plugs correctly and safely.
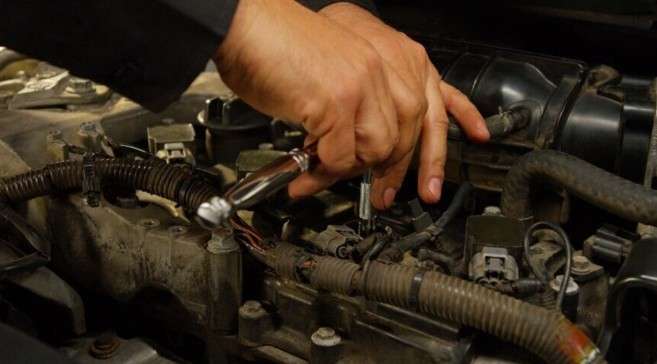
Step 1: Locate and Remove the Spark Plug Wire or Coil
- Identify the ignition wires or coil packs connected to each spark plug.
- Grasp the rubber boot (not the wire) and twist gently to break the seal.
- Pull traight out to avoid tearing the internal contact.
If your engine uses individual coil‑on‑plug (COP) systems, unplug the electrical connectors, remove the retaining bolts, and carefully pull the coil assemblies straight upward.
Tip: Label or replace one spark plug wire at a time to avoid mixing firing order connections.
Step 2: Clean the Plug Seat Area
Before removing any plug, blow away dust, oil, or debris around the plug base using compressed air or a small brush. This prevents contaminants from falling into the combustion chamber.
For equipment used in fields or construction sites, debris accumulation is common; be extra cautious.
Step 3: Remove the Old Spark Plug
- Fit your spark plug socket and loosen slowly counterclockwise.
- If resistance is high, apply a bit of penetrating oil and wait briefly.
- Avoid forcing the plug; stripping threads can be costly to fix.
Once removed, inspect the plug tip:
- Gray-brown electrodes: Normal wear.
- White deposits: Overheating or lean fuel mixture.
- Black soot: Carbon buildup from incomplete combustion.
- Oily residue: Possible piston ring or valve seal issue.
This inspection can reveal hidden problems within your engine.
Step 4: Check and Gap the New Spark Plug
Even though many plugs today are pre‑gapped, always verify the electrode gap with a feeler tool. Compare it with your machinery’s specification. Adjust carefully using the gap tool — a gap that’s too small causes weak sparks; too wide triggers misfires.
| Condition | Effect of Incorrect Gap | Solution |
| Too Narrow (<0.5 mm) | Weak ignition, misfire, knocking | Gently widen |
| Too Wide (>1 mm) | Hard starting, rough idle | Tap the ground electrode inward |
Step 5: Install the New Spark Plug
- Start by hand to avoid cross‑threading. Turn clockwise until seated snugly.
- Tighten with a torque wrench following your manual’s specification — typically between 18 – 30 lb‑ft depending on plug size and thread material.
- Do not over‑tighten; this may crack the porcelain insulator or strip the cylinder threads.
Step 6: Reinstall the Coils or Wires
- Check ignition wires and boots for cracks or brittleness. Replace if damaged.
- Apply a small amount of dielectric grease inside the boot to improve conductivity and prevent moisture intrusion.
- Reconnect wires or coils in the correct firing sequence and press them firmly into place.
- Reattach sensors, connectors, and bolts securely.
Step 7: Start and Test the Engine
Start the engine and listen for smooth, consistent idling. If it stumbles, double-check:
- Wire or coil connections.
- Correct torque and seating.
- Proper gap measurement.
A clear exhaust note, quick start, and steady idle indicate successful replacement.
Possible Issues and Solutions
Sometimes, even after following every step, minor issues can show up. Here’s what they mean and how to correct them.
| Symptom | Possible Cause | Solution |
| Engine misfire | Incorrect gap or faulty wire connection | Re‑gap and ensure connections are secure |
| Rough idle or vibration | Loose plug or coil not seated | Re‑torque the plug and check the coil alignment |
| Hard start | Plug wire reversed or gap too wide | Verify firing order and correct the gap |
| Poor fuel economy | Wrong plug heat range | Replace with a proper specification plug |
| Check Engine light | Misfire code or ignition fault | Reinspection of plug, coil, and wire harness |
Tip: Always recheck the part number and heat range before installation if your machinery exhibits persistent ignition problems.
When Do You Need to Replace a Spark Plug?
Spark plugs ensure stable ignition, complete combustion, and smooth engine output. Over time, buildup and vibration wear down electrodes, weakening the spark and performance. Many people may delay replacement, but you can determine if replacement is necessary based on the following: If any or more of the following occur, consider replacing your spark plugs.
Here are the symptoms when you need to replace spark plugs:
- Hard starting or long cranking: the plug does not fire well, so the engine takes longer to catch.
- Less power under heavy load: the burn is weaker, so the engine cannot pull as strongly when you work it hard.
- Poor fuel economy or black smoke: fuel may not burn all the way, so you waste fuel and may see darker exhaust.
- Misfire or rough engine sound: the spark may skip, which makes the engine shake or run unevenly.
- Rough idle and higher emissions: uneven burning makes the engine idle poorly and puts more pollution in the exhaust.
- Even small wear on the electrodes can delay spark timing. This can cause incomplete combustion. One misfire can also put extra strain on other parts, like ignition coils and injectors.
For most off-road equipment, it’s best practice to replace spark plugs every 20,000 to 30,000 km, or earlier if your machine operates in dusty or high-load environments such as construction and agriculture.
Conclusion
A healthy ignition system begins with spark plugs that operate well. By timely changing spark plugs, you can guarantee smoother starts, higher fuel efficiency, and maintain stable performance no matter how rugged the terrain or load is. Neglecting this small but crucial component may lead to costly engine failures later on. Following the correct steps can ensure the reliability and service life of your off-road machinery